In any breeding operation, there will inevitably be those parents who do not go along with the plan of hatching and rearing their own young, so intervention becomes necessary to save their offspring. When this situation is encountered, I try to foster eggs to other pairs whenever possible. This can sometimes lead to some interesting foster-parent/baby combinations. I’ve had pairs of Amazons who were very proficient at successfully hatching and feeding macaws and cockatoos. I’ve even fostered a Meyer’s Parrot egg under a “pair” of female Red Lories. They hatched and fed the chick for 2 weeks, at which time I pulled it for hand-feeding. Occasionally, I will use chickens, pigeons or doves to foster incubate parrot eggs, but of course these babies must be pulled for hand-feeding as soon as they hatch or better yet, the eggs should be pulled just prior to hatching.
 Red-headed Amazon with Galah Chick
When moving eggs from one nest to another or into an incubator, it is important to identify who they are. Eggs that are removed from the nest are identified with their cage number written with a fine-point Magic Marker or pencil on the large end of the egg. I put this information on the large end for three reasons: (1) so I know where to find it quickly, (2) because it’s safer to write over the air cell in case the shell is damaged by writing, and (3) because the information will remain intact after a normal hatch since the cap of the shell will come off in one piece.
Egg ID
If there are no options to foster eggs, they must be brought in for artificial incubation. Eggs that receive natural incubation for the first week or two will generally do much better than those that must be artificially incubated from the time they are laid.
Incubators
There are a number of different incubator models available on the market that range in price and quality. Many of the older models that are no longer in production, such as Humidaire and Petersime, are still very sought-after. Generally, you get what you pay for in incubators with the more expensive models being of better quality and having more options, but there is a trade-off to spending a lot of money on a single incubator.
I use Lyon Electric Turn-X 7 incubators. They are relatively inexpensive, but I’ve found them to be very good over the years. It is vital to get the Turn-X model that has the “10 Turn Potentiometer” as this is much more accurate at temperature control. I prefer not use the automatic turners because I believe they turn the eggs too often at every hour. I recommend turning the eggs 5 times per day instead.
Because Turn-X incubators are very affordable I can have several separate incubators instead of one expensive one. This way, hatching eggs can be put in a separate incubator from eggs that are not ready to hatch. This provides the flexibility to raise the humidity on hatching eggs which helps in the hatching process. It will also help prevent bacterial contamination of the other eggs from the fecal material of the newly hatched chick.
Having separate incubators will also give you the flexibility to incubate some eggs at higher humidity than others. Even though southern California is fairly arid, parrot eggs generally don’t require any water in the incubator during incubation. However, if an egg has an abnormally thin shell or a crack in the shell, it may need higher humidity than normal to prevent excess dehydration.
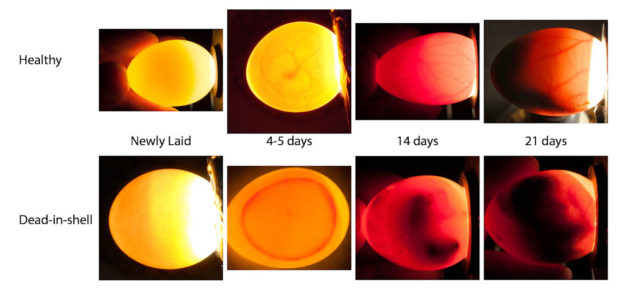
Candling Eggs – The following chart will give you a basic idea of what healthy eggs should look like compared to dead eggs. It is best to use a high-powered egg candler. The candler used to make these photos is available from Lyon Electric also.
Candling Eggs
Ideally, eggs should lose approximately 15% of their weight over the normal incubation period. You can use a range of 12% to 18% as a good target. If you are incubating from day 1, you can track this with a good scale and a piece of graph paper. The vertical Y axis will be used to record the weight of the egg, and the horizontal X axis will be the days of incubation. Get the weight of the egg when it is laid and record that on the Y axis of your graph at day 1. Multiply this fresh weight by .88 to get the 12% weight loss figure, and divide by .82 to get the 18% weight loss figure. Plot these 2 points on the line above the number of days it takes for the species to hatch. Now draw 2 lines from the fresh laid weight – 1 line to each of these 2 points on the other side of the graph to form two slightly diverging lines. Now you can weigh the egg every few days and plot the figure on the graph for that day of incubation. The point should fall within the two lines. If it is above the 2 lines, then the egg is not losing enough water. If it is below the line, it is drying out too fast. In the example below, the dots are just above the upper line indicating that this egg is just slightly too heavy and will need careful monitoring at hatching.
Charting Egg Weight Loss
If the egg weights are tracking well above the line, then intervention is needed sooner. Using a nail file, a very small amount of shell can be filled down to make it thinner and more porous to allow more evaporation. It is best to start with a small patch of shell over the air cell. Wait a couple days and weigh the egg again to see if weight loss has been improved before filing more shell if necessary.
If the weight is below the lower line, then intervention is also needed because the egg is losing too much moisture. These eggs should be moved to an incubator with high humidity. If additional measures are necessary, the egg can be painted with fingernail polish to reduce the porosity of the shell. Be sure to paint the shell with stripes to avoid creating a large area of shell that can’t respire.
Nail polish applied to shell in stripes to slow down water loss in thin-shelled egg.
The Hatching Process
As the egg approaches hatching time, it undergoes a series of changes. The first is drawdown, where the air cell begins to extend from the large end of the egg down one side of the egg. At this point, the egg should not be turned, and the drawdown portion should be kept facing up. This is the area of the egg where the chick’s beak is and is where it will make the first pip mark through the shell to allow access to fresh air as the chick switches to using its lungs to breathe.
Internal Pip – You can see the shadow of the beak sticking up into the air cell.
If everything goes normally, the chick’s beak will first break through the membrane into the air cell (internal pip), then it will make the external pip through the shell sometime after that. During this time, the chick’s lungs are taking over respiratory function. It is not unusual for the chick to sit for a couple of days without any further changes. This is the time that overanxious aviculturists often can’t resist the urge to assist the hatching process but end up injuring the chick instead. Just prior to emerging, the chick will draw the remaining yolk into its abdomen, and the blood vessels will recede. When the time is right, the chick will pip and rotate around the circumference of the egg in about 15-20 minutes. With a couple of great heaves, called surge pips, the chick will then push off the cap of the egg and emerge. Because nothing seems to be happening before the chick rotates, many people mistakenly believe the chick is stuck and needs help.
External Pip
Hatch Assistance
There are times, however, when intervention in the hatching process is necessary to save the life of the chick. In my opinion, people make hatching assistance far more complicated than it needs to be. Think of it this way – What’s the rush to get a chick out the shell? All it means is you have another mouth to feed. Relax! Instead of thinking of it as Hatch Assistance, it’s better to think of it as Breathing Assistance.
The developing embryo has lived in this shell for well over 3 weeks. It has survived off of the contents of the egg for that entire time. The only thing it has absorbed from the outside is Oxygen. As long as the chick is getting Oxygen, there is nothing urgent. Too many people feel the need to rush in and pull a chick out of a place that has served it well for 3-4 weeks. At hatching, the chick only needs to make the transition from using the blood vessels in the shell membrane to gather Oxygen, to using its lungs instead. Once the lungs are developed, the yolk is absorbed and the blood vessels will recede. It is best to let that happen with the shell intact.
There is plenty of yolk to take care of the chick’s nutritional needs for 24-48 hours after a normal hatch. There should be no rush to get a chick out of the shell if it can breathe. As long as it has access to air through the pip, it can sit there all day, even after the blood vessels recede. It’s not going to starve. It has plenty of yolk. It’s not going to dehydrate, unless you get impatient and begin removing shell too soon causing bleeding or too much exposure to outside air.
For malpositioned chicks or chicks that pip below the air cell, there is nothing urgent if the chick is vocalizing. If you can hear the chick peeping, it simply means that it is able to get air into its lungs which is a great sign. If the chick has pipped below the air cell and is vocalizing, it is getting air from outside through the pip mark – also good. There is no need to rush in to help the chick if you hear it peeping. If you put a pinhead sized hole in the shell over the air cell, it will relieve the pressure which will allow the chick more room to expand its lungs. In these cases, that is the only thing I do until the blood vessels recede. With a good high-power candler, you will be able to see if any blood vessels remain. When they are gone, and the chick is still sitting there, only then is it advisable to begin removing shell from around the tip of the beak (pip mark) and slowly expose the head and check for unabsorbed yolk and free the chick from the shell if all is ready.
Air Hole in Air Cell
The procedure is a bit more delicate for malpositioned chicks that are not able to pip the shell. The egg must be monitored with a high-power candler to see where the tip of the chick’s beak is located. This is sometimes indicated by a slight discoloration from inside the egg shell where the beak is rubbing but not able to break through. A tiny amount of shell can be lifted with a pin without disturbing the shell membrane underneath. Allow the underlying membrane to dry. Often times, the blood vessels will then recede from the area allowing you to safely make a very small hole in the membrane to allow air inside for the chick to begin breathing. Once the chick is breathing, you can relax and let it absorb the yolk and allow the blood vessels to recede on their own before pulling the chick out of the shell if necessary.
Since this external pip is below the air cell, a small amount of shell has been removed without disturbing the underlying membrane. After a couple hours, the membrane will dry out and a very small air hole can be poked through it to allow the chick to breathe fresh air.
Many people feel the need to open the air cell to see what’s going on, and wet the membrane with distilled water. Opening the air cell will promote dehydration of the chick and allow a greater chance of infection. I also recommend against wetting the membrane. That will increase the possibility of contamination and infections, and as the water evaporates, it cools the baby. Furthermore, I think it actually causes the membranes to dry out even more causing cracking. If you leave the shell intact, or only put a pinhead-sized hole into the air cell, you won’t need to worry about wetting the membranes.
Remember – It’s all about Oxygen. If the chick can breathe/vocalize, you are in good shape. Don’t watch the clock. Just leave it alone until the blood vessels are gone.
The blood vessels have completely receded, and the chick can be seen moving about inside the egg. Now the shell can be carefully removed without great risk of the chick bleeding.
Once the blood vessels have receded, the shell over the air cell is removed. Before the chick is removed from the shell, free the head and check for unabsorbed yolk or blood vessels. If necessary, the chick can be placed back into the incubator/hatcher while still half in the shell and given more time. This one is ready to come out. Chicks that are ready to come out, will also have a vigorous feeding response if the sides of the beak are touched.
One other tip, if you hold a hatching egg up to your ear and you hear some clicking sounds, all is well. Many people interpret that as the chick pecking at the shell. In reality, it is the sound of the chick breathing. The clicking is part of the sounds made by a newly functioning respiratory system. It is one of the signs to tell you that the chick is getting air to its lungs and you can relax. You can hold a newly hatched chick to your ear and hear the exact same clicking sound.
A successful hatch for an Umbrella Cockatoo
Natural incubation is best, but at times, we do need to intervene. Incubation and hatching is not complicated if common sense is used. There are few things as inspiring as watching a healthy chick make its way into the world – so tiny and helpless, yet so perfectly made to be able to develop from a single cell to a fully-functioning organism within the confines of an egg. The miracle of life certainly starts well before the chick hatches.